I actually carry everything around in a small Ziploc bag to work on when I have down time. I even baste stitch the pentagons while we drive down to the beach.
I use premade 2 inch pentagon paper pieces that I buy here.
You can cut out your own, but personally I like the card stock quality of the ones I buy and I know the shape is absolutely perfect with each pentagon I use.
I actually made a clear plastic template (not shown) to use in cutting my fabric to the correct size, to fold over the paper pieces. The clear plastic also helps me to center anything on fabric I want to highlight.
Cut out 12 pentagon shapes from your fabric. Ensure to cut fabric at least 1/4 inch larger than paper piece.
Place paper piece in center of fabric and fold over the seam allowance. Finger press into position and using big stitches baste around the pentagon. I start and end with a knot in my thread. It does NOT matter the color thread use use for the baste stitch as it will come out later on.
Decide which pentagon you want for the center and then with right sides together, whip stitch two pentagons together. Remember you are only just grabbing the fabric. DO NOT grab any of the paper piece when whip stitching the pentagons together.
Repeat until you have 5 "petals". Then repeat with the other 6 pentagons.
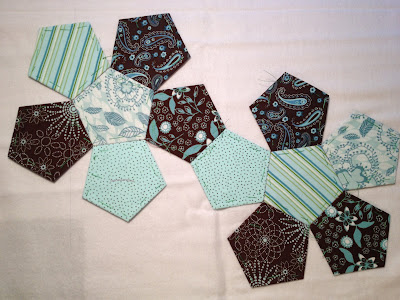
Once you have 12 pentagons baste stitched lay them out as shown below to whip stitch them together into a ball. (You can also press them flat with a warm iron before joining them together.)
Now you can snip your baste thread and remove all the paper pieces. I save mine to reuse for another ball.
Once all the paper pieces are removed and baste thread pulled out. Turn your ball right side out and begin stuffing.
I put small jingle bells in the baby balls. But since I'm a safety freak I sew the bells into little muslin pockets to insert into the ball. I do this step when the ball is about half way stuffed.
Make sure to use your finger or a pencil eraser to poke out all the connection points of each pentagon.
Stuff very firm and I use a ladder stitch to close up the ball.
Perfect project for all your fabric scraps!
Linking up today with Made by you Monday, by Skip to my Lou.


Dear Cherie,
ReplyDeletethank you very much for your tutorial. It was very helpful and I made such a ball this evening. Because I haven't a baby my dog got the ball ;-))
"Your writing style is both informative and enjoyable. It's clear that you have a passion for the subjects you cover, and it shines through in every post. Well done!"
ReplyDeletehttps://www.discountdrift.com/promotions/
"I appreciate the thoughtfulness and inclusivity reflected in your blog's content. Your commitment to addressing a diverse range of perspectives and experiences enriches the overall reading experience. It's evident that you value the diversity of your audience."
ReplyDeletehttps://www.couponsstudio.com/all-stores